
After home construction or renovation, the kitchen usually becomes the most affected area in terms of dust and debris. Fine construction dust, grout haze, paint splatters, adhesive residue, sawdust, and leftover materials accumulate on every surface, including cabinets, countertops, tiles, appliances, and even inside drawers. These residues not only make the kitchen look unfinished but can also pose hygiene and safety risks if not properly cleaned. Because the kitchen is a space where food is prepared, ensuring it is free from dust, chemical residues, and debris is essential before use.
Cleaning a newly constructed kitchen requires a systematic and thorough approach to restore cleanliness, protect newly installed surfaces, and ensure the space is safe for everyday use. This comprehensive guide provides step-by-step instructions for cleaning all kitchen areas, from top to bottom, covering cabinets, countertops, appliances, tiles, floors, and hidden spots like vents and drawers. By following this method, homeowners can achieve a hygienic, polished, and fully functional kitchen that is ready for daily cooking and use.
Why is it Important to clean a Kitchen After Construction
Cleaning a kitchen after construction requires following the correct method because construction dust, adhesive residues, and paint splatters can damage surfaces or appliances if not handled properly. A systematic approach ensures the space is fully clean, safe, and ready for use.
- Safety First: Construction dust and leftover materials can be harmful if inhaled or touched. Using protective gloves, masks, and goggles ensures your safety.
- Specialized Dust Removal: Kitchens accumulate fine dust in cabinets, appliances, and vents. HEPA vacuums and microfiber cloths help remove even the smallest particles.
- Attention to Hidden Areas: Corners, inside cabinets, vents, and behind appliances often trap dust and debris. Cleaning these areas prevents buildup and ensures hygiene.
- Sanitation: Proper cleaning eliminates bacteria, leftover adhesives, and residues from countertops, sinks, and appliances, making the kitchen safe for food preparation.
Best Time to Start Kitchen Cleaning After Construction
The best time to start kitchen cleaning after construction is only once all building work is fully completed. Cleaning too early can result in dust resettling, smudging freshly finished surfaces, or damaging newly installed fixtures. Waiting ensures a more efficient and thorough cleaning process.
- Carpentry, tiling, electrical, and plumbing work are done: All major construction tasks must be finished to avoid resettling dust or debris.
- Grout, silicone, paint, and adhesives are fully dry: Ensures surfaces are safe to wipe without smearing or damaging finishes.
- No more drilling, sanding, or cutting will take place: Prevents additional dust from accumulating on cleaned surfaces.
- Dust has settled for 24–48 hours: Fine particles have time to settle, making vacuuming and wiping more effective.
- All appliances and fixtures are installed: Allows for complete cleaning of all surfaces, including hidden or hard-to-reach areas.
Tools and Supplies Needed for Kitchen Cleaning
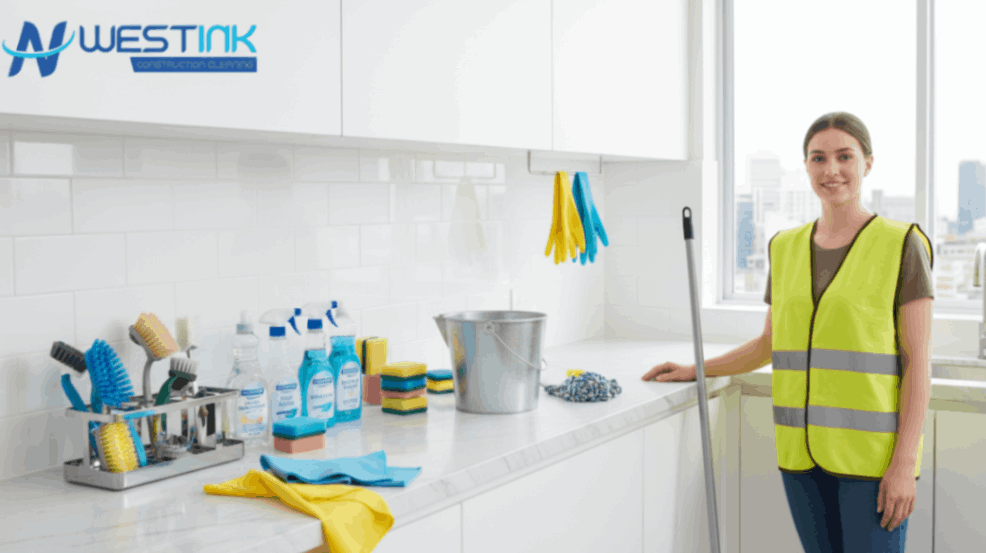
Using the right tools and supplies is essential for safe, effective, and efficient kitchen cleaning after construction. Proper equipment helps remove dust, debris, and residues without damaging surfaces or appliances, while also saving time and effort. Preparing everything beforehand ensures a smooth, organized cleaning process.
- HEPA vacuum cleaner: Captures ultra-fine construction dust and prevents it from becoming airborne again. The U.S. Environmental Protection Agency (EPA) confirms that true HEPA filters trap at least 99.97% of particles 0.3 microns and larger — ideal for post-construction cleanup.
- Microfiber cloths and mops: Gently clean surfaces without scratching tiles, countertops, or appliances.
- Neutral pH cleaner: Safe for various surfaces like stone, laminate, and painted cabinets.
- Non-abrasive sponges and soft scrub brush: Remove stains and residue without damaging delicate finishes.
- Scraper or razor blade: Safely lifts dried adhesive, paint spots, or grout residue.
- Tile and grout cleaner: Deep cleans grout lines and wall/floor tiles effectively.
- Glass cleaner: Leaves windows, glass cabinet doors, and backsplash streak-free.
- Bucket and mop: For rinsing and mopping floors after dust and residue removal.
- Gloves, mask, and goggles: Protects your skin, eyes, and respiratory system from dust and chemicals.
- Step stool: Reaches high cabinets, vents, or ceiling fixtures safely.
- Trash bags and spray bottles: Collect debris and apply cleaning solutions efficiently.
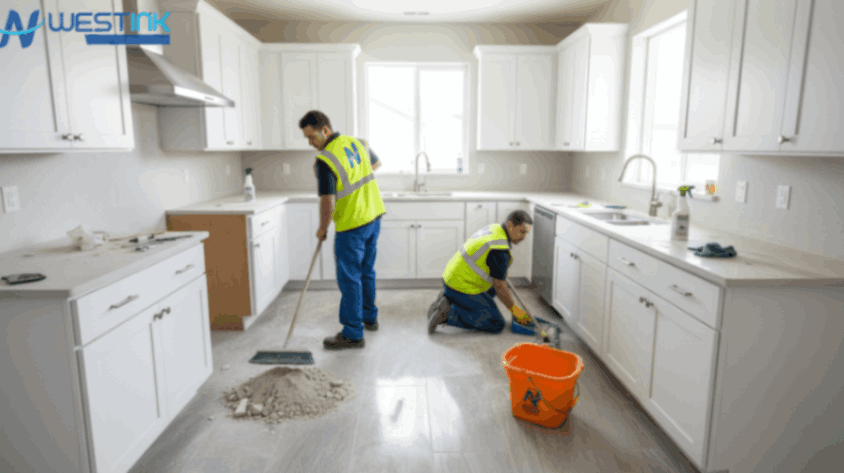
Remove All Construction Debris
Removing all construction debris is the first and crucial step before deep cleaning the kitchen. Clearing visible materials prevents dust from spreading further and creates a safe, organized workspace for detailed cleaning. This step ensures that subsequent cleaning efforts are more effective and thorough.
- Cardboard, plastic wrapping, tape, and stickers: Removing packaging and adhesive residues prevents them from sticking to surfaces.
- Sawdust piles, cement, or grout chunks: Clears heavy debris that can scratch floors or countertops if left unattended.
- Nails, screws, or small hardware: Prevents accidents and protects cleaning tools from damage.
- Appliance boxes and protective films: Removing boxes and films ensures cabinets and appliances are accessible and ready for cleaning.
Vacuum the Entire Kitchen From Corner to Corner
Vacuuming the entire kitchen from top to bottom is essential to remove fine construction dust before wiping or mopping. Dust settles everywhere, including hidden corners and vents, so starting from the top ensures particles don’t fall onto already cleaned surfaces. A thorough vacuuming step makes the following cleaning steps faster, safer, and more effective.
- Top Areas: Ceiling corners, light fixtures, and ceiling vents or fans – removes dust that could settle onto surfaces below.
- Mid-Level Areas: Top of cabinets, inside cabinets and drawers, backsplash, countertops, open shelves, and window frames – ensures all surfaces that touch daily items are clean.
- Lower Areas: Baseboards, floor edges, under appliances, and the entire floor – prevents dust from mixing with water during mopping and scratching floors.
Clean Cabinets and Drawers
Cleaning cabinets and drawers after construction ensures that dust, adhesive residue, and debris don’t settle on your kitchenware. Attention to interiors, exteriors, and hardware prevents damage and keeps the kitchen hygienic. Proper drying before use is important to avoid mold, stains, or lingering moisture.
- Open all cabinets and drawers: Allows access to every surface for thorough cleaning.
- Vacuum shelves and corners: Removes fine dust and debris that can accumulate in hidden areas.
- Wipe interior with a damp microfiber cloth: Safely removes remaining dust without scratching surfaces.
- Clean hinges, handles, and drawer tracks: Ensures smooth operation and prevents dirt buildup.
- Wipe top and front of cabinets: Cleans visible surfaces for a polished finish.
- Ensure cabinets are fully dry before placing items inside: Prevents mold, moisture damage, and keeps the space hygienic.
Clean Countertops
Cleaning kitchen countertops after construction is crucial because dust, paint specks, and adhesive residues can damage the surface or make it unhygienic for food preparation. Using the right tools and cleaners ensures the countertops remain spotless and scratch-free, whether they are quartz, granite, laminate, or stone.
- Vacuum loose dust: Removes fine particles that could scratch or embed into the surface during wiping.
- Wipe with neutral pH cleaner: Safely cleans without damaging the finish or causing discoloration.
- Use a scraper for dried glue or paint: Carefully removes hardened residues without scratching the countertop.
- Clean backsplash and polish with microfiber cloth: Ensures a streak-free shine and removes leftover construction residue.
- Safe for quartz, granite, laminate, or stone surfaces: Protects all types of countertop materials while giving a professional finish.
Clean Tiles and Grout
Tiles and grout often collect fine construction dust and stubborn grout haze. The National Tile Contractors Association (NTCA) advises using a sulfamic-acid-based haze remover and a white nylon scrub pad — never steel wool — to safely eliminate haze without etching the tile or weakening the grout.
- Vacuum wall and floor tiles: Remove loose dust and debris before scrubbing to avoid scratching.
- Spray tile-safe cleaner: Loosens grime, grout haze, and residues for easier cleaning.
- Scrub grout lines lightly: Cleans trapped dirt without damaging the grout or tiles.
- Rinse with warm water: Removes cleaner residue and prevents streaks or soap buildup.
- Dry with a microfiber cloth: Ensures tiles are shiny and streak-free.
- Check for leftover grout powder and repeat if needed: Guarantees all construction residue is removed for a polished finish.
Clean All Appliances
After construction, kitchen appliances often accumulate dust, paint specks, adhesive residue, and packaging debris. Proper cleaning restores their appearance, ensures hygiene, and prevents damage to sensitive surfaces or controls, making them ready for immediate use.
- Refrigerator exterior and top: Wipe down to remove dust, fingerprints, and packaging residue.
- Oven door and knobs: Clean thoroughly to remove grease, dust, or paint splatters.
- Microwave interior and exterior: Ensure crumbs, dust, and adhesive residues are cleared.
- Dishwasher door: Wipe surfaces and remove protective films.
- Stovetop and burners: Clean grease and construction dust without scratching surfaces.
- Range hood and filters: Remove, wash, and reinstall filters for proper airflow.
- Built-in appliances: Vacuum and wipe all vents, panels, and handles.
- Use microfiber cloths and safe cleaners: Protect stainless steel, glass, and plastic surfaces from scratches or chemical damage.
Clean the Sink and Faucet
The sink and faucet often collect construction dust, adhesive residue, and paint spots, making them appear dull and unhygienic. Proper cleaning ensures these areas are safe for food prep and restore their shine.
- Remove packaging residue: Clear stickers, tape, and any protective films.
- Scrub the sink basin: Use a non-abrasive sponge to clean thoroughly without scratching the surface.
- Clean drain edges and around the faucet: Ensure no dust, grout, or adhesive remains in tight corners.
- Wipe and polish the faucet: Use a suitable cleaner to make chrome or stainless steel shine.
- Clear construction debris from the drain: Check for any leftover dust or small particles.
- Leave the sink spotless: A fully cleaned sink and faucet prevent future stains and ensure hygiene for first use.
Clean Windows, Glass, and Glass Cabinet Doors
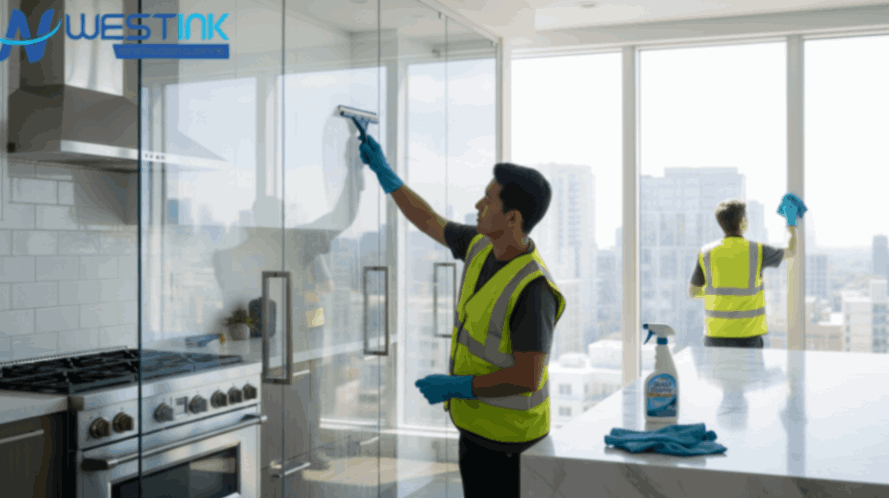
Glass surfaces in kitchens, such as windows and cabinet doors, easily show construction dust, paint splatters, and fingerprints. Proper cleaning restores clarity and ensures streak-free shine.
- Spray glass cleaner: Use a safe solution to break down dust and residues.
- Wipe with microfiber cloth: Avoid scratches and ensure a streak-free finish.
- Scrape gently if needed: Remove paint droplets or adhesive spots carefully.
- Clean tracks and frames: Include sliding channels and window sills to remove hidden dirt.
- Wipe both sides: If accessible, clean interior and exterior glass surfaces for full clarity.
Wipe All Surfaces and Fixtures
After dust removal, every surface must be wiped to remove remaining fine dust and residues.
- Walls, doors, and handles: Remove fingerprints, dust, and debris.
- Switchboards, window frames, shelves: Wipe carefully to maintain finishes.
- Cabinet edges, pantry shelves, under-sink area: Prevent dirt accumulation in hidden spots.
- Appliance handles and light switches: Ensure hygiene before first use.
- Repeat wiping if necessary: Construction dust may resettle; a second pass ensures thorough cleaning.
Deep Clean the Kitchen Floor
The floor accumulates the most dust, dirt, and leftover debris, so a proper deep clean is essential.
- Tiles: Vacuum first, mop with neutral pH cleaner, and remove dried cement spots with a scraper.
- Vinyl: Use mild cleaner and avoid harsh chemicals or hot water.
- Wooden floors: Vacuum with soft brush attachment, clean with wood-safe solution, and avoid excess water.
- Final dry mop: Ensures no water marks or dust residues remain.
Clean Air Vents, Filters, and Exhaust Fans
Construction dust often hides in ventilation systems and exhaust fans. Cleaning these ensures good airflow and prevents dust circulation.
- Remove AC vent covers: Vacuum and wipe clean.
- Clean exhaust fans: Remove fan covers, vacuum blades, wipe, and reinstall.
- Wash or replace filters: Maintain fresh air and reduce dust buildup.
Final Touches Before Using the Kitchen
Final touches make the kitchen move-in ready and spotless.
- Polish appliances and countertops: Restore shine after cleaning.
- Re-wipe cabinet handles and backsplash: Remove any remaining dust or streaks.
- Mop the floor again: Ensure cleanliness of the walking surface.
- Open windows or use air purifier: Ventilate the space for fresh air.
- Arrange kitchen items: Drawer liners, pantry organization, and placement of items complete the setup.
- Inspect corners and hidden areas: Make sure no dust or residue remains in hard-to-reach spots.
DIY vs Professional Kitchen Post-Construction Cleaning

Cleaning a kitchen after construction can be done either by yourself (DIY) or by hiring professionals. The choice depends on the size of the kitchen, the amount of dust and debris, and the time you can dedicate. DIY cleaning works well for small kitchens or minor post-construction dust, but it may miss hidden dirt in corners, vents, or behind appliances.
DIY Cleaning
Suitable for light tasks, it saves money but can be less thorough. Small details like grout haze, adhesive residue, or dust inside cabinets might be overlooked.
Professional Cleaning
Experts offer a fast, efficient, and comprehensive clean. They remove heavy dust, grout haze, paint splatters, adhesives, and deep stains, ensuring all surfaces—including hard-to-reach areas—are spotless. Ideal for large kitchens, major renovations, or newly built homes, professional cleaning also protects surfaces and saves time in the long run.
- o achieve a spotless kitchen after construction, avoiding common mistakes is essential. Incorrect cleaning can damage surfaces or leave hidden dust and residue.
- Cleaning before dust has settled: Dust may resettle, making you redo the cleaning. Always wait 24–48 hours after construction finishes.
- Using abrasive scrubbers: Can scratch tiles, glass, or stainless steel surfaces. Use soft sponges or microfiber cloths instead.
- Ignoring grout haze or adhesive residue: These can harden over time and stain surfaces. Clean grout and sticky spots promptly.
- Forgetting tops of cabinets, vent covers, or filters: Dust accumulates in hidden areas. Neglecting them spreads dust back into the kitchen.
- Using too much water on wooden floors: Excess water damages wood surfaces. Use minimal moisture and a wood-safe cleaner.
- Leaving protective films or packaging materials behind: These can trap dust or adhesive. Remove all films for a thorough clean.
Conclusion
Cleaning a kitchen after home construction requires patience, the right tools, and a systematic approach. By removing debris, vacuuming top to bottom, cleaning cabinets, appliances, tiles, floors, and vents, you can transform a dusty construction site into a hygienic, polished, and move-in ready kitchen. Proper cleaning ensures safety, protects surfaces, and makes the kitchen fully functional for everyday use
Frequently Asked Questions (Kitchen Cleaning After Construction)
- How long should I wait after construction before cleaning my kitchen?
Wait at least 24–48 hours after construction to allow dust and debris to settle. This prevents repeated cleaning and ensures thorough dust removal. - Can I use regular household cleaners for post-construction dust?
It’s better to use neutral pH cleaners and specialized products. Harsh chemicals can damage tiles, countertops, and appliances. - What’s the best way to clean kitchen cabinets after construction?
Vacuum shelves first, then wipe interiors and exteriors with a damp microfiber cloth. Clean handles and hinges carefully to avoid scratches. - Should I clean kitchen appliances before or after dusting the room?
Always vacuum and dust the kitchen first. Cleaning appliances afterward prevents fine dust from resettling on cleaned surfaces. - How do I remove grout haze from tiles effectively?
Use a grout-safe cleaner, scrub lightly with a grout brush, and rinse with warm water. Repeat if residue remains. - Can construction dust affect ventilation in the kitchen?
Yes. Dust can accumulate in AC vents and exhaust fans, reducing airflow and spreading fine particles. Clean vents and filters thoroughly. - Are there surfaces that need extra care during cleaning?
Yes. Quartz, granite, laminate countertops, wooden floors, and stainless steel appliances require gentle cleaning methods to avoid scratches or stains. - Is professional cleaning necessary for a newly constructed kitchen?
Professional cleaning is recommended for large kitchens, heavy construction dust, or if time and tools are limited. They ensure a thorough and safe clean. - How do I clean hidden areas like under appliances and behind cabinets?
Use a HEPA vacuum and microfiber cloths to reach corners and hidden spaces. Step stools or small brushes help access tight spots. - Can I prevent future dust accumulation after cleaning?
Yes. Regular vacuuming, wiping surfaces, and cleaning vents or filters periodically will keep your kitchen cleaner for longer.